🍸 Beyond the Shaker: The Not-So-Ordinary Tools I Use Behind the Bar

Updated: Oct 11

🍸 Beyond the Shaker: The Not-So-Ordinary Tools I Use Behind the Bar
A quick note: This post contains paid links. As an Amazon Associate I earn from qualifying purchases.
Once you start making your own cocktail ingredients, the prep area starts looking a little different.
There’s an infusion working. Something is filtering. A foam needs testing. And somewhere in the middle of all of it, you still need to make a cocktail that tastes good.
That’s a pretty familiar scene at Melinda’s Alley.
I’m heading into my fifth year as lead mixologist, helping develop about 50 new cocktail menus a year. That weekly R&D gives me plenty of reasons to keep learning and experimenting.
In my everyday bar-tools guide, I covered the foundation. This time, let’s get into the less ordinary equipment, how it works, and where it becomes useful. I’ve also included a few optional additions for anyone building out their own setup.
🫧 ANOTHER LAYER: The Cocktail Whipper
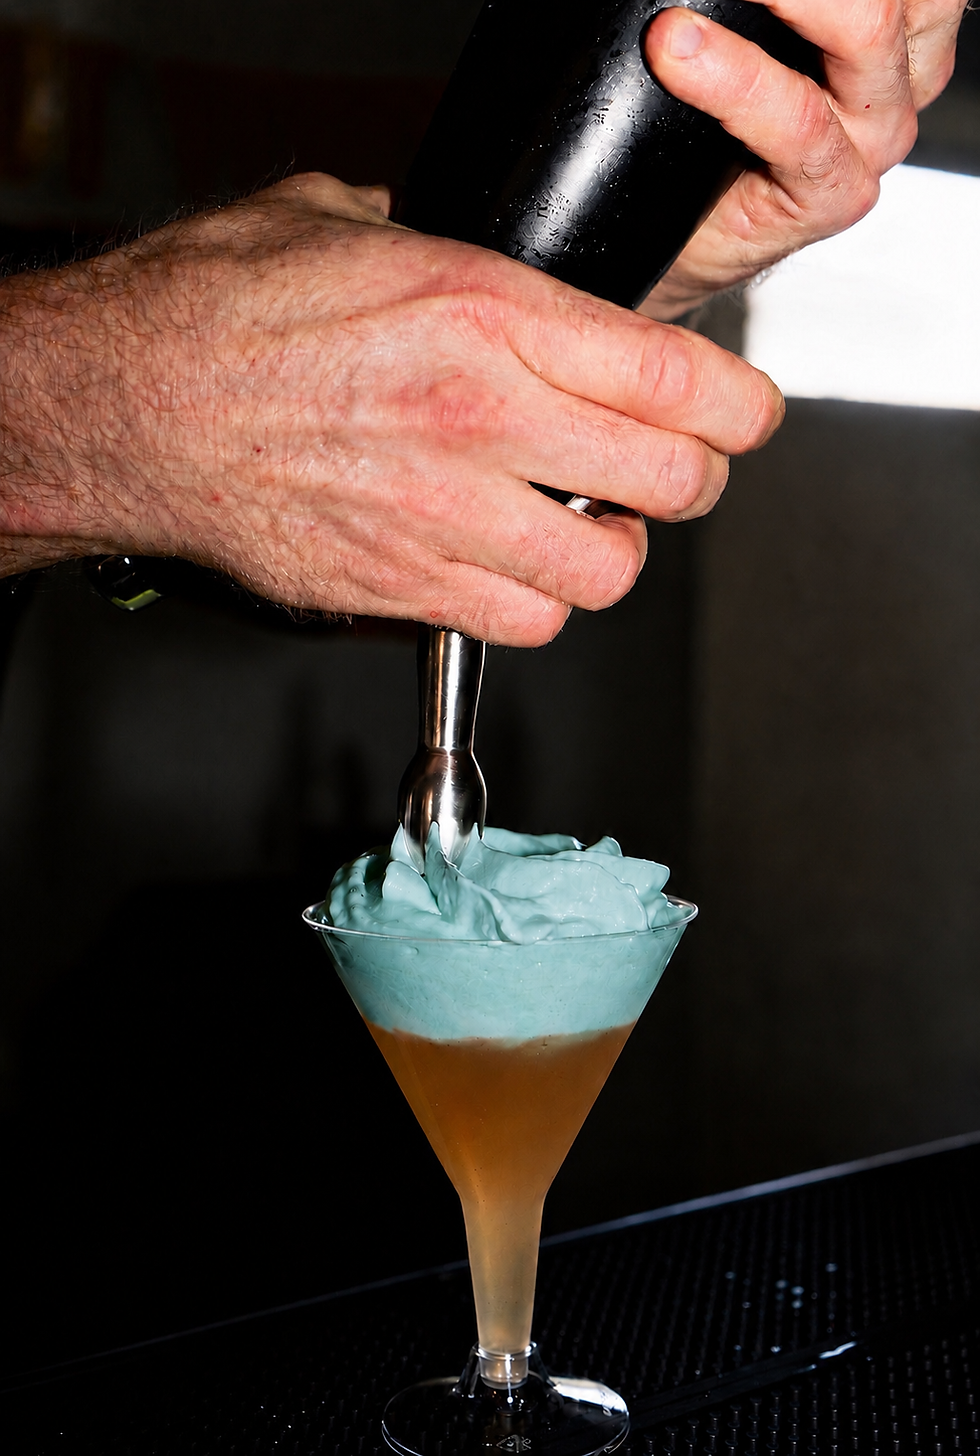
I use an iSi whipper for cocktail foams.
The whipper holds a prepared mixture under pressure and dispenses it through a nozzle.
With a suitable recipe, that gives you a foam you can portion onto a cocktail, adding flavor and texture right at the surface.
It’s useful when you want the topping to be its own component. You can develop the drink and foam separately, then taste them together and adjust the amount of each.
A foam also needs to behave during service. Check how easily it dispenses, whether it holds its shape long enough,
and whether the guest can comfortably drink through it.
Read the instructions for your exact model. Follow its fill limit, charger requirements, temperature limits, and cleaning directions. Strain particles out of the mixture, and never unscrew a pressurized whipper. Different whippers and chargers have different approved uses.
Shopping option: ICO one-pint aluminum whipper. This model is for cold preparations only; follow its own instructions rather than transferring settings from an iSi.
🌡️ BUILDING FLAVOR: The Sous Vide

I use a sous vide setup for infusions.
It maintains a controlled water bath around a suitable sealed container holding your ingredients. That lets you work with temperature and time while pulling flavor into a spirit or another cocktail ingredient.
A typical starting point in my infusion work is around 130°F for roughly one to two hours, depending on what’s going into it.
That last part matters.
Delicate herbs and assertive spices can need much less time. Keep the ingredient, its quantity, and the flavor you’re after in mind instead of automatically leaving every batch for two hours.
Write down the weights, liquid volume, temperature, and time. When something works, you have a starting point for repeating it. When it doesn’t, you can change one variable instead of guessing.
This is an infusion starting point, not a universal cooking or pasteurization schedule. Use a tested recipe, heat-appropriate food-safe containers, and the proper cooling and storage method for that preparation.
Shopping option: INKBIRD ISV-100W sous vide.
🔻 BIGGER PREP JOBS: The Chinois Strainer
A chinois is the cone-shaped strainer you’ll recognize from professional kitchens. For cocktail prep, look at the fine-mesh version and check the actual mesh rather than buying on shape alone.
Its larger capacity comes in handy when you’re straining a batch of syrup, an infusion, or a fruit preparation. The cone helps direct the liquid into the container underneath while holding back solids.
Set it securely over a suitable vessel or use a compatible stand. Give yourself enough space for the whole batch, because discovering the container is too small halfway through a sticky syrup is pretty annoying.
Let the preparation and intended texture guide how you strain. Forcing pulp through the mesh can give you a different result than letting liquid drain. Clean the mesh promptly so sugar and fruit don’t dry into it.
Shopping option: HIC 7-inch chinois.
🔬 GOING FINER: Filters and Clarification Tools
I also use filtration in my prep and clarification work.
Depending on the method, paper filters or food-safe filtering cloth can help separate finer particles after larger solids have been removed. Support the filter properly and leave room in the receiving container.
Clarified milk punch deserves patience. Follow the clarification method through to the filtering stage; a finer filter alone won’t magically clarify every cloudy ingredient.
Avoid squeezing or disturbing the filter bed when the method relies on gentle filtration.
Rushing can undo the clean finish you’re working toward.
Taste the ingredient afterward. Clarification can change its texture and flavor as well as its appearance, so the original cocktail proportions may need adjusting.
One important note: filtering a dairy-based milk punch doesn’t make it safe for someone with a milk allergy.
Shopping option: Chemex FSU-100 bonded paper filters. Choose filters that suit your recipe and support them securely.
☁️ MORE THAN AIR FOAM: The Handheld Frother
I use a handheld frother for air foams, but it has a few other useful jobs.
For an air foam, the small whisk incorporates air into a prepared liquid. A suitable foaming ingredient and recipe help the bubbles hold together. Give yourself enough room in the container for the mixture to expand without spraying the counter.
It can also make whisking up egg white for a cocktail easier. You’re helping aerate and combine the mixture before finishing the cocktail according to its recipe. You still need to chill and dilute the drink properly, usually by shaking with ice.
Use pasteurized egg whites or a pasteurized egg product for an uncooked cocktail. Frothing doesn’t pasteurize an egg.
And yes, you can use a frother for dairy-based cold foam, too. A chilled milk or cream mixture gives you another topping to experiment with; its ingredients determine the texture and stability. Keep dairy refrigerated and clean the whisk thoroughly between preparations.
Shopping option: Zulay handheld milk frother.
🫧 CONTINUOUS AIR FOAMS: The Aquarium Air Pump

Here's a fun technique that doesn't require expensive professional equipment.
A simple aquarium air pump with diffuser stones can provide the airflow needed to create light, delicate cocktail foams.
The pump pushes air through a tube into a diffuser stone submerged in your prepared foam mixture. With the right foaming agent, such as soy lecithin, bubbles collect at the surface, ready to be spooned onto your cocktail.
It's a technique worth experimenting with when developing aromatic foams using
citrus, fresh herbs, teas, or fruit.
My equipment pick: Uniclife Dual Outlet Aquarium Air Pump
This affordable kit includes two diffuser stones, tubing, check valves, and adjustable airflow.
The two outlets are especially convenient when experimenting with different foams.
Shopping option: Uniclife Aquarium Air Pump
View on Amazon:
A quick safety tip: Aquarium equipment isn't automatically food-safe. Before using this method for drinks, replace any non-food-contact-rated tubing and stones with components verified for culinary use. Never use equipment previously installed in an aquarium.
🥃 DIRECTING THE SMOKE: A Cocktail Smoker

A glass-top cocktail smoker gives the wood chips a dedicated chamber and directs the smoke into the glass. That’s the piece of the setup that works alongside the torch.
The Middleton Mixology SmokeTop sits on a glass rim, with a small chimney and mesh screen holding the chips above the drink.
Use culinary smoking chips and follow the manufacturer’s lighting instructions. Check that it rests securely on your particular
glass before lighting it.
Start with a little smoke, then taste. You can test a lighter aromatic finish against a more pronounced smoked presentation and decide what suits the cocktail.
The goal is a cool drink with added aroma. You’re not cooking or flaming the liquid. Work with ventilation, keep the flame away from the drink and open alcohol bottles, and let the smoker cool before handling or cleaning it. Dispose of spent chips in a nonflammable container.
Shopping option: Middleton Mixology SmokeTop, Smoker + Cherry Chips version. The linked option includes a starter sample of cherry chips and requires a separate butane torch. The torch below serves a different role: igniting the chips.
View on Amazon
🔥 AROMA AT THE GLASS: The Torch

I use a torch as part of smoked cocktail presentations.
Smoke changes what the guest smells as the glass arrives. The material you smoke and the amount of exposure both affect that experience, so test the presentation with the actual cocktail.
Too much smoke can take over pretty quickly.
A culinary torch can also be useful for carefully caramelizing a suitable garnish on a separate heat-resistant surface. That opens up a different direction from smoking: a change in the garnish’s texture, appearance, and flavor.
Follow the torch’s instructions, work with ventilation, and keep the flame away from alcohol, bottles, and flammable materials. Use smoking materials intended for culinary use, and let hot garnishes or equipment cool appropriately before serving or handling.
Shopping option: Iwatani PRO2 culinary torch. Check the compatible fuel and whether it is sold separately.
🍋 CLEAN GARNISH PREP: A Good Y-Peeler
A standard Y-peeler is a practical tool for broad citrus peels and long, flat cucumber ribbons.
For cucumber ribbons, work lengthwise along a firm cucumber with steady pressure. For a citrus garnish, follow the fruit’s curve and aim for a broad strip of peel without taking too much of the bitter white pith underneath.
The blade and your control both matter. Keep your fingers clear of its path, use a secure grip, and work slowly enough to see the thickness you’re getting. Fresh, firm produce gives you a better starting point than trying to rescue a soft cucumber with a different gadget.
The OXO Good Grips Y-Peeler is the shopping option here. Its shape is suited to broad peeling passes, including cucumber ribbons. Rinse the blade promptly after prep so citrus oils and pieces of peel don’t sit on it.
🌀 LONG CITRUS TWISTS: An End-Mounted Channel Knife

For a long, narrow citrus twist, the position of the cutter matters.
The Mercer Culinary M15500P channel knife has its cutting notch at the front of the head, aligned with the handle. That gives you an end-mounted option if you find the sideways cutters on some combination zesters awkward to use.
The channel cuts a narrow strip as you draw it along the citrus peel. Work with firm fruit, keep your grip secure, and use a steady motion and light pressure. You’re aiming for an even strip of peel rather than digging deeply into the white pith.
Keep the Y-peeler for broad citrus strips and flat ribbons. This channel knife is the option here for the longer, narrower twists. The two tools have different jobs, so you can choose the cut you actually want.
Shopping option: Mercer Culinary M15500P channel knife.
🧰 A FEW OPTIONAL ADDITIONS
If you want to keep exploring, these are three more tools worth considering for specific jobs.
🍊 A Dehydrator
A dehydrator gives you controlled warm airflow for drying garnish ingredients. Evenly cut citrus wheels are a familiar starting point, but drying time depends on the fruit, thickness, machine, and conditions.
Follow a tested drying method, check the pieces throughout the batch, and cool them before storage. Packaging partially dried fruit and assuming it will last indefinitely is asking for trouble. Think about storage and quality as part of the prep.
Shopping option: COSORI food dehydrator.
💨 An Atomizer
A food-safe atomizer lets you apply a light mist of an aromatic ingredient over a drink or inside a glass. That can be useful when you want something like an absinthe aroma without adding a full measured pour.
Test how much your sprayer delivers, keep the nozzle clean, and label the bottle clearly.
Start small; the aroma reaches the guest before the first sip. Spray away from flames and heat sources.
Shopping option: True 8157 cocktail atomizer.
💧 A Precision Dropper
A food-safe dropper is useful for small additions of saline or a prepared tincture. It helps when a little ingredient can noticeably change the drink.
Drops vary with the dropper and liquid, though. Use the same setup when testing and repeating a recipe, and use proper measurements when scaling to a batch. Label every bottle so nobody has to guess what’s inside.
Shopping option: AOZITA clear 2-ounce dropper bottles, four-pack with measured glass droppers.
🥃 Saints & Spirits Takeaway
Pick a technique you’re curious about and give yourself time to learn it.
Make a small test. Keep notes. Taste the drink with the new element, then taste it without it.
That comparison tells you whether the extra prep earned its place. Once you understand one tool, you’ll have a much better idea of what you actually want to try next.
🥂 Join the Saints & Spirits Community

Want more recipes, behind-the-scenes R&D, bartending tips, and new techniques to try?
Come learn along with me and see what makes it into the glass next.
🍸 Let’s Create Something Worth Confessing
Planning a private event, looking for a hands-on cocktail class, or interested in a custom menu or collaboration?

Comments